Merge Companies with Different GSTINs
TallyPrime now comes with the flexibility and ease to merge your existing companies with different GST registrations into a single company, where you can view all the details of different GSTINs.
Your business might be using multiple GST registrations (GSTINs) for multiple branches or units, which are an integral part of your own company. To cater to your special needs, TallyPrime comes with the multi-GSTIN feature, which will help you to conveniently maintain all your GST registrations within a single company. What’s more, you also have the flexibility to merge these existing companies with different registrations into a single company.
For example, if you have been maintaining two different companies for two of your branch offices with different GST registrations, then you can easily merge both these companies into a single company. After that, you can simply continue to maintain these two branches as two registrations under your main company.
To merge the companies, you only have to export the masters and transactions from the existing companies and then import them into the current company. That’s it. You are good to go!
All your details will automatically appear under the specific registrations, and you can proceed to record your transactions, as usual, for the required registration.
Prerequisites | What You Need to Do Before Merging the Companies
To ensure a smooth and seamless merger of all your companies into a single company, you have to complete a couple of prerequisites, which include the following activities.
- Migrate company data: The multi-GSTIN feature will only be available from TallyPrime Release 3.0 onwards. Therefore, if your companies were created in an earlier release, then you have to migrate the companies to TallyPrime Release 3.0 or later.
Refer to the Migrate Company Data topic to know more about migration to Release 3.0. - Update Voucher Number Series: Once you migrate your company data to TallyPrime Release 3.0 or later, the name of the voucher series will be retained as Default for all the companies. However, it is essential to maintain unique voucher number series for each of your registrations, before merging your companies. Therefore, it is recommended that you rename the voucher number series appropriately for each of your registrations. For example, if you have a Karnataka registration and a Tamil Nadu registration, then you can rename the voucher numbering series as KA Registration and TN Registration, respectively.
Refer to the Create Voucher Numbering Series section of the Getting Started with GST in TallyPrime topic to know more about voucher numbering series.
Export Masters & Transactions of Existing Companies
Once you have migrated your data to TallyPrime Release 3.0 or later and updated the voucher numbering series, it is time to export the masters and transactions for all the companies that you want to merge.
For example, if you have two companies, National Enterprises – Karnataka, with Karnataka registration, and National Enterprises – Tamil Nadu, with Tamil Nadu registration, then you can export the data from these two companies, and import them into the main company, say, National Enterprises – HO.
- Open the required company.
- Export the masters of your company:
- Press Alt+E for Export > Masters.

The Export sub-screen appears.

- Press C (Configure) to update the export settings.
The Export Configuration screen appears.

- Select All Masters as the Type of master.
This will ensure that all the masters in your company are exported. - Select XML (Data Interchange) as the File Format.
- Update the other export settings, as per your preference.
- Press Ctrl+A to accept and return to the Export sub-screen.
- Press Alt+E for Export > Masters.
- Press E (Send) to export.
The exported file will be saved in the selected Folder Path. - Export the transactions of your company, using the same steps by which you had exported the masters.
Similarly, repeat the procedure for all your GST registrations. You can rename the exported files, as needed, to avoid any confusion.
Import Existing Masters & Transactions into the Main Company
Once you have exported the masters and transactions of the required companies, you can easily import them into the main company where you want to maintain the different registrations.
- Open the company where you want to import the details.
- Import the masters of your company:
- Press Alt+O for Import > Masters.

The Import Masters sub-screen appears.

- Specify the File path where your exported masters file is located.
- Under File to import (XML), select the file that has to be imported.
- Under Behaviour of import if master already exists, select Modify with new data.
- Press Ctrl+A to import the masters.
The details from the imported masters will appear in the main company.
- Press Alt+O for Import > Masters.
- Import the transactions of your company, using the same steps by which you had imported the masters.
Similarly, repeat the procedure for all your GST registrations.
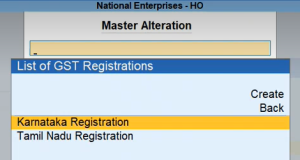
Now you can check the details of the imported registrations from the Master Alteration screen, by pressing Alt+G (Go To) > Alter Master > GST Registration.

Similarly, you can check the details of the imported transactions by referring to the Day Book and other reports.

Further, if you drill down to the transactions, then you can see the details of the GST registrations.


Once the import is complete, you can proceed to record your transactions for all your registrations with great ease, from the same company.


